Connecting Shopify to Meta (Formerly Facebook) is vital if you want to monitor your orders, products, and customers in one place. The best way to do this is with the Pixel. This guide runs through how to add a Facebook pixel to your Shopify store.
As Meta’s exclusive monitoring tool, Pixel allows Shopify store owners to track the interactions and navigations of various people visiting their stores. The interactions commonly referred to as events play a vital role in analytics and when setting up marketing campaigns.
Don’t know how to add a Facebook Pixel to Shopify Online Store? Worry no more. We will explain everything to you in detail. To get started find your Facebook Pixel.
What is a Facebook Pixel?
A pixel is a JavaScript counter, which is issued to the owner of the Facebook advertising account for installation on the site. This piece of JavaScript code is added to all pages of the site. It remembers everyone who has visited the site, collects detailed data about all users and their actions, and then transfers it to the Facebook AdsManager.
Facebook Pixel Features
This element has many valuable features. Here are just a few of them:
- Collection of data about users and their behavior on a web resource or landing page. For example, a visitor clicked on an advertising post, went to the landing page, added the product to the cart, and made a conversion. Pixel lists it, which can then be used to analyze the target audience and fine-tune targeting;
- Evaluation of traffic conversion and the effectiveness and payback of an advertising campaign. The relevance of your product to the interests of the target audience is always based on hypotheses. The pixel allows you to understand how accurate they are and whether your offer meets the expectations of those who clicked on the ad;
- Increase sales and apply automatic bid management strategies—The platform independently selects potential customers based on the data received. This allows you to go beyond the hypothesis about the target audience and various FB settings. The social network contains huge statistics about the interests of users. If you set optimization for conversions, the system will select new customers for you automatically;
- Optimization of promotions—Facebook’s machine learning algorithms allows you to target impressions to users who are initially interested in your product and are more likely to make a purchase. In addition, you can remove non-working options and leave only those ads that bring results.
- Conversion setting—Thanks to Facebook Pixel, you can see at what point a visitor achieves a goal – downloading a price tag, buying a product, or registering for an event. It will be possible to run separate ads for each category of customers in the future.
Among other things, the pixel allows you to collect an audience for re-marketing and set up similar and combined target audiences. Based on the data of your audience, the platform will help you find people with the same interests within the social network. To do this, it will study thousands of different points – age, gender, geolocation, etc.
Adding A Facebook Pixel to Your Shopify Store
Here are the steps you should follow to add Facebook Pixel to your Shopify Store.
1. Get your Facebook Pixel ID
The first thing you need to do is find your Facebook Pixel ID.
Go to Facebook Business Settings, which is under Ads Manager. Access the Data Source section, where you will find the Pixels option. Click on it, and you will be able to create a Pixel (if you haven’t already) or see the one you have created before but have not yet been able to set it up correctly on your online store.
To install the Pixel, you can use a specific integration, do it manually yourself, or ask a developer to carry out the task on your behalf. The simplest method is utilizing a special service, such as Tag Manager.
2. Key in the Pixel ID on your Shopify Store
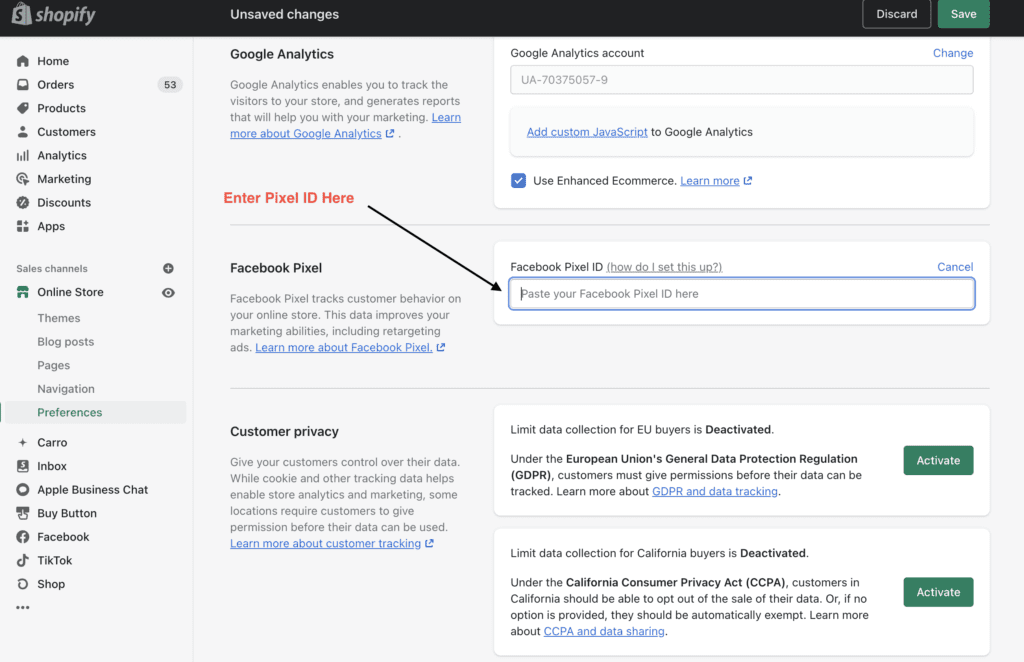
Once you are done with the previous step, log in to Shopify and go to the “Online Store” section. You should then go to the “Preferences” area. Scroll down. You will come across the “Facebook Pixel ID” section as you scroll down gently. Here, key in your pixel ID.

3. Check the status of your Pixel on Facebook
Choose “Pixel” once again from the menu before looking at it to see if your Facebook Pixel is working properly. For example, if the Pixel status indicates that there is still no activity, it means that the Pixel is not working. However, please also note that it can take about 20 minutes to see any changes, so we suggest you wait a bit.
The reasons why your Pixel is not working correctly could be numerous, but the main one is that there is a problem with the code. So, delete it and enter it again. It could also happen that some rules on your site do not match the Pixel settings.
There are adequate guides on Shopify on the correct use of Pixel. We recommend that you carefully examine if you cannot even carry out the right set of this important feature for monitoring activities.
Suppose you can’t solve it even by consulting the rich Shopify guide on using Pixel. In that case, all you have to do is contact the support of the e-commerce platform, specifying what the problems you found were, perhaps attaching the error screens.
We are sure that in a short time, you will be able to find a solution to this specific obstacle, and you will therefore be able to start using this useful performance indicator, which will be very useful for you to be able to better orient your strategy and your operational policy on Shopify.
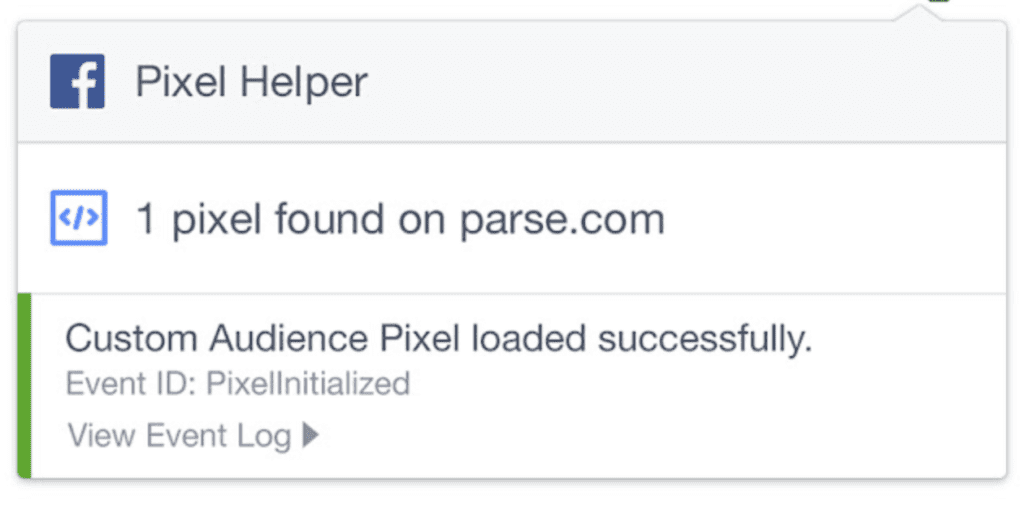
There is also a useful Chrome extension that can be used for checking your Pixel. The extension is called Facebook Pixel Helper – linked here

The Main Advantages of the Facebook Pixel for Your Shopify Store
1. Track website conversions
(purchase, add to cart, lead, subscription to a newsletter.): you can know when a person arrives on a specific page and count a conversion if there is a conversion. For example, Facebook will know if you have a new lead who has filled out a contact form on your website because the pixel will detect the form submission confirmation page (this is the page that indicates the conversion).
2. Retargeting advertising (or retargeting)
As Facebook can know who has visited your website and find them on its platform; you can show targeted advertising to people who have visited your website. Most of the time, brands show a prospect a product he went to see on the site or added to his basket.
3. Convert visitors into prospects or buyers
90% of visitors to a website leave it without ever returning; however, thanks to the pixel, you have a chance to reach these same visitors and make them want to come back or even buy!
4. Optimize ads to create conversions
Pixel data will help you optimize your ads for specific events: purchase, add to cart and generate leads. Facebook will therefore seek out the people most likely to make the event you have chosen to optimize.
5. Find new customers
You can create similar audiences (lookalike) to reach people with a profile similar to your best customers.
6. Measure the results of your advertisements
With the analytics tool, you can understand the performance of your advertisements by discovering the results they generate. You can view information such as your conversions and sales.
- Changing or Removing Facebook Pixel from Your Shopify Store
- Go to your admin page and select the Facebook option
- Go to settings
- Visit the ‘Data Sharing Settings‘ part and select ‘Disconnect‘ to do away with the current pixel code
Create A New Pixel Or Connect Another One
If you’ve edited the theme file code of your site before to include Facebook pixel, make sure you remove the pixel code before adding a new Facebook pixel ID through the Facebook option. Failure to remove the code will make your site have more than one pixel code. This can result in inaccurate reporting or duplicate data reports.
Removing Pixel Code from the Theme File
- Go to the ‘Online Store‘ option in your Shopify admin
- Go to ‘Themes’ and select ‘Actions‘ in the ‘Current Themes’ section
- Choose the option ‘Edit Code.’
- Open the code editor by clicking on the theme.liquid file
- In the <head> and </head> tags, you will find your Facebook Pixel code, which you can delete.
- Click “Save”
Removing Facebook Pixel Code Via Online Store Preferences
- Go to ‘Online Store‘ in your Shopify admin section
- Go to ‘Preferences‘
- Click ‘Change‘ in the ‘Facebook Pixel’ area
- Delete Facebook pixel
- Save
These are the simple procedures to follow if you want to delete or remove a Facebook pixel from your Shopify store. You don’t need programming knowledge to carry out the procedures.
A Final Note
Analyzing the target audience and accurately understanding its basic needs is the key to effective Facebook ad targeting. Only by knowing your users well will you be able to draw an accurate sample of the several billion people registered on this social network. Facebook Pixel makes it easy for you to gather valuable data.
Create Circus Ltd is a Shopify expert and e-commerce agency based in the UK specializing in everything e-commerce, from custom theme development to app integrations and sales channels.
You may also need to add Google Analytics to your Shopify store. Google Analytics is another important way of tracking data just like the Facebook Pixel.


